Sticky Rice and Mung Bean Cakes / Banh Tet
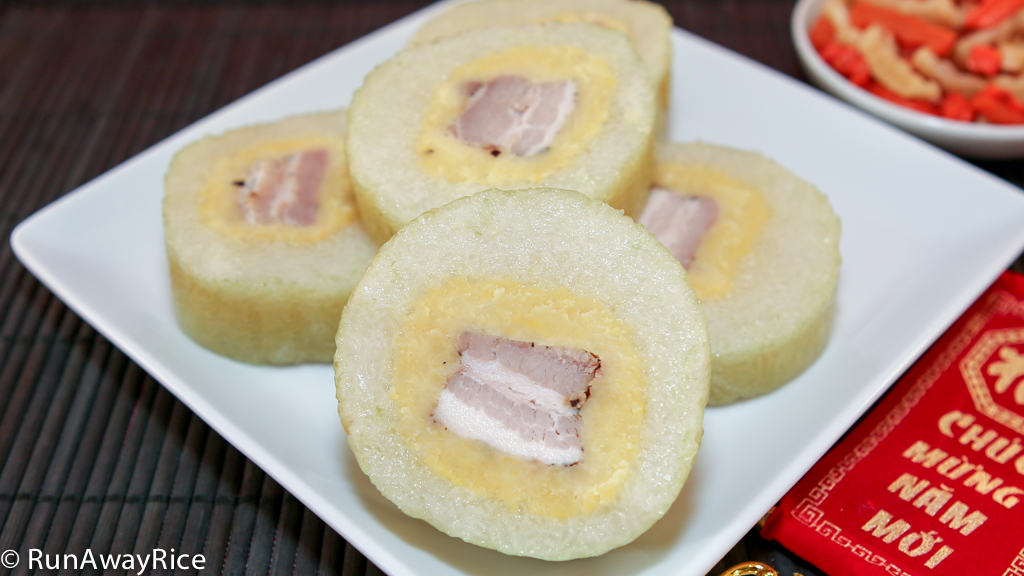
Sticky Rice and Mung Bean Cakes (Banh Tet) are must-have foods for Vietnamese New Year / Tet. There are many variations on the filling, some sweet and others savory. This recipe is the savory version with a mung bean and pork filling. Unlike their square-shaped siblings, Square Sticky Rice and Mung Bean Cakes (Banh Chung), these cakes are smaller, cylindrical and overall easier to make. If you live in an area with a large Asian community, you'll find these cakes everywhere, especially around this time of the year. It may be tempting to just buy them. However, if you have the time, I encourage you to make these at home. They are just amazing when homemade!
- Prep time
- 2 hr 30 min
- Cook time
- 4 hr
- Yield
- 4 servings
- Difficulty
- HARD
Ingredients
Quantities are shown as originally provided.
- 3/4 lb pork belly
- 1/2 tsp coarsely ground black pepper
- 1/2 tsp sugar
- 2 1/2 tsp salt (, divided)
- 2 Tbsp minced shallots
- 1/2 Tbsp fish sauce
- 3 cups mashed mung beans
- 16 oz frozen banana leaves
- 6 cups long-grain glutinous/sweet rice
- ruler
- 2 (8 1/2 x 11 inch) sheets of paper
- scotch tape
- 4 (16 inch) lengths of string (, used as temporary ties)
- 4 (9 feet) lengths of cooking string or twine
- aluminum foil
Instructions
- 1
Cut the pork belly into 4 (1 inch) wide strips and then trim so each strip to 5 inches long. Optionally, remove the pork skin and discard.
- 2
Combine the pork with ground black pepper, sugar, 1/2 tsp salt, minced shallots and fish sauce. Marinate in refrigerator for at least 1 hour.
- 3
Lay a piece of plastic wrap on the work surface. Take 3/4 cup mashed mung beans and divide in half. Spread out each mung bean half into 5 inch long sections.
- 4
Place a piece of marinated pork on top of one of the mung bean strips. Place the other mung bean strip on top. Using your hands, press the mashed mung bean around the pork. Roll and shape into a log.
- 5
Wrap the log in plastic wrap.
- 6
Repeat the above steps, making a total of 4 logs.
- 7
Measure the logs and make sure they're approximately 5 inches long.
- 8
Freeze the filling logs overnight.
- 9
Tape together the 2 sheets of 8 1/2 x 11 inch paper to form an 11 inch square paper template.
- 10
Thaw the banana leaves at room temperature for at least 1 hour. Gently unfold and separate the banana leaves. Using the paper template, cut out 12 sheets of banana leaves. (You'll need 3 sheets of banana leaves per cake). Cut a few extra sheets just in case some tear while washing.
- 11
Clean the banana leaves by washing both sides in hot water. Wipe both sides of the leaves dry with paper towels.
- 12
Moisten 2 large sheets of paper towels and place the cleaned banana leaves between the towels. Place the cleaned banana leaves back into the original plastic bag and then seal with tape.
- 13
Refrigerate the banana leaves until they're ready to use.
- 14
Wash the glutinous rice by rinsing with cool water until the water is mostly clear. Fill the basin with cold water and let the rice soak overnight.
- 15
Remove the filling logs from the freezer.
- 16
Rinse the glutinous rice with cold water one more time. Drain in a large colander. Toss the rice in the colander to remove any excess water. Add the remaining 2 tsp salt and combine with the rice.
- 17
Place a 16 inch string vertically on the work surface.
- 18
Place the first banana leaf on the work surface with the shiny side down and veins running horizontally. Place the second banana leaf on top of the first in the same way. Place the third banana leaf on top of the other 2 leaves with the shiny side up and veins running vertically.
- 19
Place 1/2 cup glutinous rice on the center of the banana leaves. Spread out the rice so it's 1/4 inch high and just a bit bigger than the filling log. Place the filling log on top of the rice.
- 20
Bring the banana leaves up and hold together with one hand. Add another 1/2 cup glutinous rice on top of the filling log. Using a spoon, add more rice to the sides of the cake. Smooth out the top, encasing the filling with an even amount of rice.
- 21
While holding the top portion of banana leaves, wrap the bottom portion securely around the log. Bring the top portion of the leaves down and wrap firmly around the cake. Tie the string around the middle of the cake to secure in place.
- 22
Fold the leaves over on the one end and stand the cake up. Pat the cake with your palms to settle the rice. Add 4 heaping tablespoons rice to the end, cover the filling. Fold the banana leaves (like you would a present) covering the end completely.
- 23
Flip the cake over, standing it on the folded end now. Repeat the same process of adding rice and folding the banana leaves for the remaining end.
- 24
Tie the cakes securely with a 9 feet section of cooking string. (Please see video for this part.)
- 25
Continue with these same steps until all 4 cakes are made.
- 26
Wrap the cakes with a generous amount of aluminum foil.
- 27
Transfer the cakes into a 20 quart stockpot standing each cake on its end.
- 28
Fill the pot with water until it almost covers the cakes. Place a heavy lid or plate on top of the cakes. Add more water until the cakes are completely immersed in water.
- 29
Cover the pot and bring to a boil using High heat.
- 30
Reduce heat to Low and cook for 4 hours.
- 31
Check the water level every 1 hour and add boiling water as needed. (Do not add cold water. This will halt the cooking process and ruin the cakes.)
- 32
After boiling for 2 hours, flip the cakes.
- 33
After 4 hours, carefully remove the cakes from the pot using tongs.
- 34
Remove the foil and rinse each cake with cold water.
- 35
Dry the cakes with a kitchen towel.
- 36
Wrap each cake in plastic wrap and allow to cool for 4 hours.
- 37
To Serve: Cut off the string. Unwrap the cake by removing the banana leaves and discarding. Cut the cake into thick slices using a sharp knife or with cooking twine. (See the video for a demonstration.)
- 38
Enjoy the Sticky Rice and Mung Bean Cakes with savory Dried Carrot and Radish Pickles.
- 39
Store the Sticky Rice and Mung Bean Cakes at room temperature for up to 2 days. Refrigerate for up to 2 weeks. Freeze the whole cakes for up to 6 months.