ribbon cake(two layer vanilla cake)
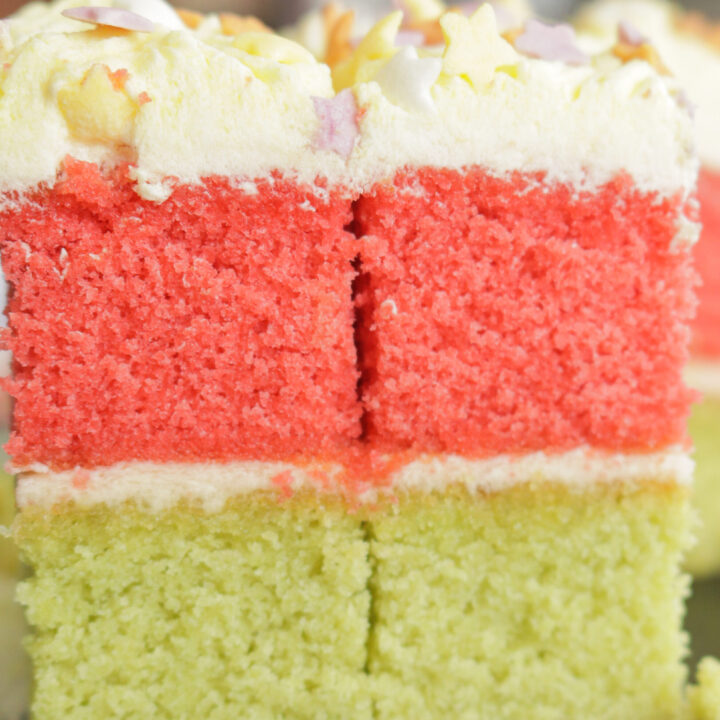
Ribbon cake, a two-layer vanilla cake covered in buttercream icing. Try out this layered vanilla cake recipe for your special occasions. From birthdays to festivals, you can now make a ribbon cake right at home.
- Prep time
- 2 min
- Cook time
- 3 min
- Yield
- 20 servings
- Difficulty
- HARD
Ingredients
- The ingredients mentioned below use standard measuring cups and spoons.
- For the cake batter
- 281 g all-purpose flour(2 and 1/4 cup, I used this conversion calculator to convert grams to cups)
- 2 and 1/4 teaspoon baking powder
- 1/4 tsp salt
- 160 g unsalted butter(3/4 cups, unsalted butter is preferable but you can substitute with fat spreads like Astra or Meadowlee if you are living in Sri Lanka)
- 3 large eggs
- 300 g sugar(1 and 1/4 cup, granulated or powdered)
- 1 and 1/2 teaspoon of vanilla
- 1 cup milk
- green food coloring
- Pink food coloring
- 250 g slightly cool, soft butter
- 500 g icing sugar(sifted)
- 1/2 tsp vanilla
- 1-2 tbsp fresh milk
- yellow food coloring for the icing(only optional)
- Edible sprinkles(optional)
Instructions
- 1
If you haven’t read my tips and notes above, please scroll up, read and continue with the recipe.
- 2
These tips were written by me, having made the ribbon cake a couple of times, so you can avoid them.
- 3
Have a medium-sized bowl ready to hold your spatula. The bowl will come in handy when you are not using the hand mixer, as it will help you avoid batter from dropping onto your workspace.
- 4
To have all ingredients at room temperature, remove them from your fridge 45 minutes to 1 hour from your fridge.
- 5
Granulate sugar using a food processor or blender.
- 6
Sift the powdered sugar.
- 7
Combine and sift the dry ingredients to evenly distribute them.
- 8
Brush some butter all around the cake baking pan before lining it with parchment paper. This will allow the baking paper to stay in place.
- 9
The batter for the ribbon cake.
- 10
Add butter to your mixing bowl.Cream the butter for 2 minutes on medium-high(speed 2 or 3) until pale and smooth.
- 11
Gradually add the powdered sugar(sifted first) into the butter.
- 12
Cream the butter and sugar for 2-3 minutes until fluffy and smooth.
- 13
There should not be any sugar lumps at this point.
- 14
Time to add the eggs to the butter and sugar cream.
- 15
Avoid cracking eggs directly into the batter.
- 16
Instead, break them into a bowl and then transfer them to the cream.
- 17
Add one egg at a time to the cream and blend for 10 seconds for each egg.
- 18
Finally, add the vanilla.
- 19
Keep your mixing to a minimum, which would mean 2-3 rounds from your hand mixer at low speed (speed 1).
- 20
How your batter will look once all 3 eggs are added and minimal mixing is involved.
- 21
Start with a cup of flour.
- 22
Mix for just 5 seconds using your mixer at a low speed.
- 23
Followed by 1/4 cup of milk, combine for a few seconds.
- 24
Repeat the process of adding flour and milk alternately.
- 25
Use minimum mixing and low speed for 10 seconds.
- 26
If you still find the ribbon batter not smooth, then replace the mixer and use your spatula and use a wide arc in one direction to mix the batter.
- 27
Your ribbon cake batter should look light and airy.
- 28
Have the two bowls and spoons to be used close to the batter.
- 29
Use a measuring cup to equally separate the batter.
- 30
Once you have the two bowls of batter, it’s time to add the colours.
- 31
If you do have a pipette, then use it to add equal drops of colouring.
- 32
Make sure you don’t mix the colours by using the same utensils.
- 33
I used my 1/8 teaspoon and only filled it halfway to get a pale but brighter green and pink colour.
- 34
Mix them separately to combine and mix in the colour.
- 35
You can start preheating your oven at this time to 170C.
- 36
Add the batter to each of the prepared baking pans.
- 37
Use your spatula to smooth out the cake batter. Make sure to clean the spatula before smoothing the next coloured batter.
- 38
Gently shake the batter to level it out.
- 39
Tap the pan to remove any air bubbles.
- 40
Bake at 170C for 25 minutes. This time will vary depending on your oven, altitude, etc.
- 41
The difference would not be much but keep an eye on the last minute of baking time.
- 42
Insert a toothpick into the baked cake; if the toothpick comes out clean, the cake is baked through.
- 43
Let the cake cool in the pan until they are cool enough to handle.
- 44
Then transfer the cake onto a tray to cool further.
- 45
Once the cakes are cool enough and you don’t have enough time to assemble the cake then here’s what you do.
- 46
Let the cake completely cool.
- 47
Wrap them both with cling film and refrigerate. You can leave the cake to be completed the next day or leave it for a few hours to continue assembling the cake later.
- 48
Make the buttercream icing before you remove the cake from the fridge so you can assemble the cake without stopping halfway.
- 49
Add butter to the bowl and whisk until pale.
- 50
Add the sifted sugar to the butter gradually and mix for a few minutes at high speed.
- 51
Add vanilla and continue to mix for 20 seconds. Add milk and mix for another 30 seconds until you have a thick and smooth buttercream.
- 52
If you are not using it immediately, refrigerate it until used.
- 53
Place the first cake(coloured pink on a flat surface, and level the cake by slicing the top of the cake so it’s flat.
- 54
Do the same to the second cake(coloured green).
- 55
Now, place both cakes on top of each other, trim the four sides to give you two equal-sized square cakes.
- 56
NOTE-If you are going to leave the sides without icing and only frost the top of the cake, then avoid trimming the sides at this point.
- 57
This will allow you to have a neater finish when you decorate the top and then trim off the sides.
- 58
How to crumb coat the ribbon cake
- 59
Add a dollop of buttercream icing to the surface(tray or cake board) and place the pink cake on top and press firmly to stick to the tray.
- 60
Take one cup of the buttercream frosting to a separate bowl.
- 61
Mix for a few seconds and add a thick layer on top of the pink cake as a filling.
- 62
Use your spatula to spread out the buttercream frosting.
- 63
Gently place the second cake over(green)the buttercream filling, align with the bottom cake, and press slightly to set it.
- 64
Don’t worry about any buttercream squeezing out of the layers, as this can be used as a crumb coat.
- 65
Now add a few tablespoons of buttercream on top of the cake.
- 66
Use a frosting spatula to add a thin crumb coat on all sides of the cake.
- 67
Smooth out the icing, all around and on top of the cake to capture all the crumbs.
- 68
Refrigerate for 30-1 hour so the crumb coat sets.
- 69
Once the crumb coat sets, fill a piping bag with some buttercream icing and pipe a few lines on top of the cake and around the cake.
- 70
Avoid piping the four sides if you are going to trim the sides and only the top of the cake is going to be frosted.
- 71
Again, use a frosting spatula to spread and smooth out this layer of icing to give it a good finish.
- 72
Refrigerate again to set for 30-45 minutes.
- 73
While the ribbon cake is in the fridge, you can add a few drops of food colouring to the remaining buttercream icing.
- 74
For a pale and light yellow frosting, a line of colouring from a toothpick should do.
- 75
Once you have the correct tinge, fill a piping bag with the yellow icing.
- 76
Remove the cake from the fridge, cut a small opening, pipe the icing as you did before above, and smooth out the yellow icing.
- 77
Place in the fridge for 20 minutes.
- 78
Once the icing is firm, run a fork through the icing in opposite directions all over the cake to give it a little decorative texture.
- 79
Wipe around the cake to remove any stray icing drops.
- 80
And then add sprinkles(optional).
- 81
Refrigerate again to set for 20 minutes and then serve.You can also leave the sides to show the two-toned colour and add a buttercream layer just on top.
- 82
As mentioned above, to leave the sides exposed and for a neater finish, you can now trim all four sides to expose
- 83
This gives a slightly sweeter and more balanced taste of icing and cake to enjoy.