Obento お弁当
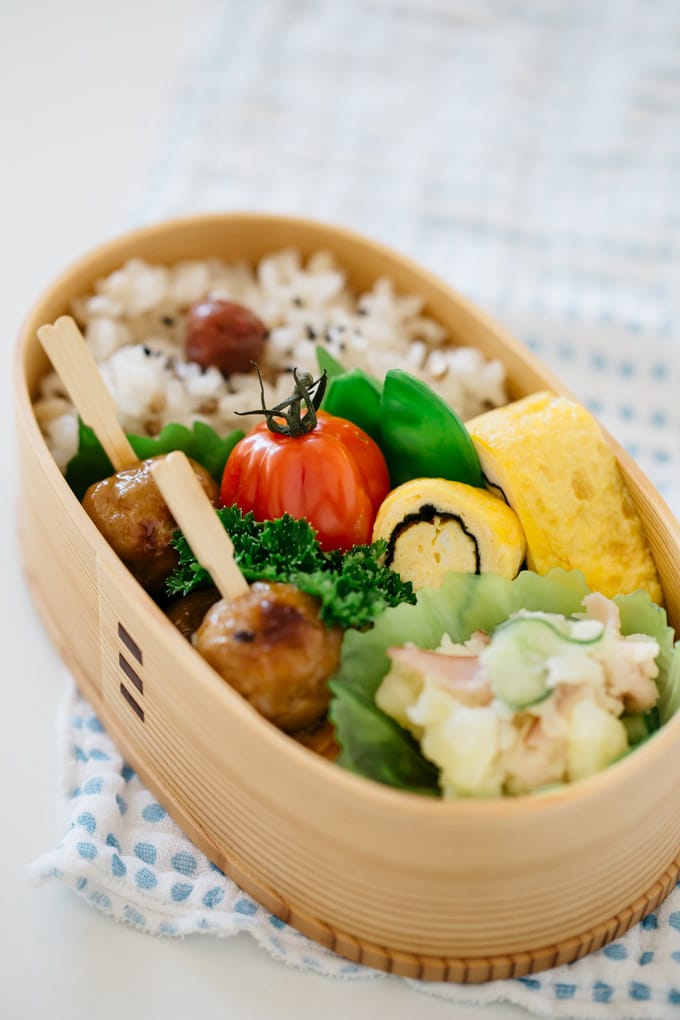
How to assemble Obento like Japanese do, with step by step photos. Menu of the example - Sweet & sour meatballs, Tamagoyaki, and Japanese potato salad.
- Prep time
- 30 min
- Cook time
- 30 min
- Yield
- 1 serving
- Difficulty
- HARD
Ingredients
Quantities are shown as originally provided.
- 150 g cooked rice (*1)
- 5 g butter
- 1/4 onion finely chopped
- 250 g Ground pork (*3)
- 1/2 large egg (*12)
- pinch of salt
- 1 tsp Katakuriko(Potato starch)
- 600 ml Oil for deep fry (*4)
- 1/4 cup water
- Pinch of Torigara Soup powder (*5)
- 1 tbs soy sauce
- 1 tbs sugar
- 1/2 tbs mirin
- 1 tbs rice vinegar (*6)
- 1 tsp katakuriko(potato starch)
- 2 1/2 large eggs (*12)
- 1/2 tbsp shirodashi (*8)
- 1/4 of nori sheet
- 1/2 tbsp oil
- 1/4 onion
- half lebanese cucumber sliced
- 350 g Potatoes
- 50 g ham chopped
- 2 tbsp Kewpie Japanese mayonnaise (*10)
- pinch of salt to taste
- 4 parboiled sugar snap peas
- 1 bunch of broccolini
- 1 mini tomato
- 2 shiso leaves (*11)
- parsley to garnish
Instructions
- 1
Sweet & Sour Meatballs
- 2
Add butter into a small frying pan over medium heat.
- 3
Add finely chopped onion and cook it until onion become transparent and soft.
- 4
Let it cool and set aside.
- 5
Place ground meat in a mixing bowl and add egg, salt, potato starch and cooked onion.
- 6
Combine them well with your hand until it become a little sticky. Make 18 pin-pong ball sized meatballs.
- 7
Heat oil to 180°C (356°F) and deep fry the meatballs until it become golden brown. *13
- 8
Set aside the meatballs. You could do up to this steps a night before in order to save time in the morning.
- 9
Place water, torigara soup powder, soy sauce, sugar, mirin, rice vinegar and potato starch in a saucepan.
- 10
Bring it simmer and become thicken.
- 11
Add meatballs to the saucepan and coat the thickened sauce well.
- 12
Tamagoyaki *7
- 13
Crack the eggs into a mixing bowl and add shirodashi.
- 14
Mix them all together and strain the egg mixture a few times.
- 15
Heat the oil in a rectangle shaped frying pan(if you have)*14 and remove the excess with a kitchen paper. Keep the oil soaked kitchen paper for later steps.
- 16
Pour about 1/3 of egg mixture, scramble them a little bit and when the egg solidified a little, push them towards an end ot of the pan.
- 17
Wipe the empty side of the pan with oil soaked kitchen paper and pour another 1/3 of the egg mixture.
- 18
Lift the pushed egg to let the egg mixture run under it.
- 19
Place the nori sheet over the newly poured egg before they get solidified.
- 20
Roll the egg from the one side of the pan.
- 21
Repeat the same for remaining egg mixture.
- 22
Turn the heat off and remove the rolled egg from the pan and let it cool.
- 23
Slice the rolled egg about 2cm(7.9inch) thick.
- 24
Potato salad *9
- 25
Chop the onion finely and soak them in water in a small mixing bowl. Soak about 10 minutes. Drain the water and squeeze out excess water and set aside.
- 26
Slice the cucumber thinly and sprinkle a pinch of water. Leave it about 5 minutes or the salt withdraw the water out of cucumber. Squeeze the moisture out of cucumber and set aside.
- 27
Peel the potato and cut them small.
- 28
Boil the potato for about 10 minutes or potato become soft. Drain the cooking water and mash the potatoes.
- 29
Place mashed potato, onion, cucumber and ham into a mixing bowl.
- 30
Add mayonnaise and salt to combine them all together.
- 31
Assemble all together into a lunch box
- 32
Place rice first, then shiso leaves, meatballs, sugar snap peas, rolled egg, tomato and potato salad. If there is any gap, fill the gap with green vegetables and parsley.
- 33
Sprinkle sesame seeds over the rice and top with Umeboshi. *See above step by step photos.